

I think one downside of all the emails and automated reporting we do nowadays is that people tend to start using their emails as document storage. I also means that when someone else needs to be brought up to speed on a certain operation either all previous emails need to forwarded or hope that they are saved on a NAS. Even worse sometimes they are stored on personal drives.
One way in which I have been trying to prevent those issues is to commit to keeping up the SharePoint site for my department up to date, which includes copies of all historical automated reports that are sent out to executives. This allows for there to be a central repository of these reports, allows not technical personnel to search for them easily, and the day to day management doesn't need to be handled by me but just someone with a bit of experience (It also allows to use Flow and PowerApps for some stuff, but that's outside the scope of this post). Now SharePoint (an the whole Office 365) is not my favorite but you gotta work with what you have got, and I will admit that their API is pretty easy to use.
Microsoft Graph API
Setup
A quick overview of Microsoft Graph can be found on MS site. Basically its the gateway we can use to access all sorts of information in Office 365.
In order for us to use the API we must first register our application on the Azure Portal. The Microsoft documentation is pretty good at explaining the process. The main information we will need at the end is
- Client ID
- Client Secret
With just that information we can then generate an Oauth2 Authorization token and start getting data from office 365. For example we could use postman to make all the graph calls.
Postman
Using Postman is pretty straight forward. We just need to set the authorization to use the Oauth2 protocol.

Then we can generate the first token, {tenant} will be specific to your organizations as will your Client ID and Client Secret.
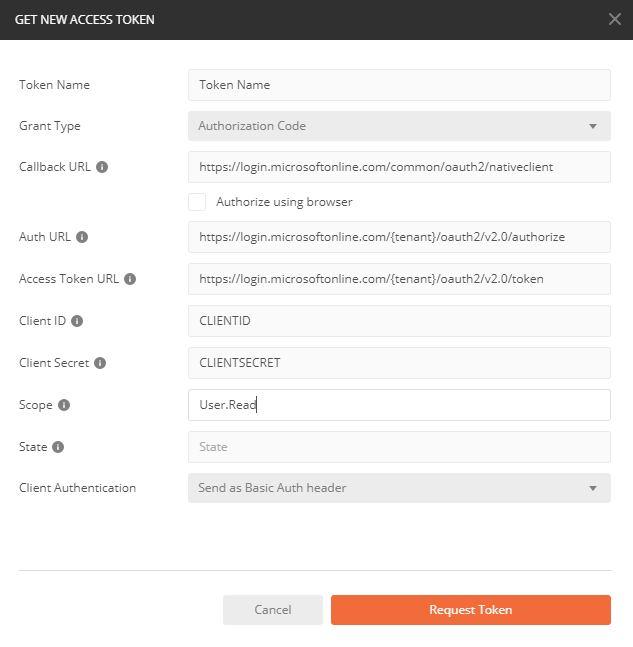
Now we can select our specific token and make calls to microsoft graph form the API.
requests_oauthlib
However I don't want to use postman to update handle my interactions with MS graph. We can easily do this directly from python.
We will accomplish this using the requests-oauthlib library.
First as the documentation tells us to do we install the package
pip install requests requests_oauthlib
requests_oauthlib makes it easy to manage an Oauth2 Session. We can start a session and make http calls with it by just doing (assuming we are using a config module to keep all our necessary parameters) the following.
graph=requests_oauthlib.Oauth2(config.CLIENT_ID, scope=config.SCOPES,
redirect_uri=config.REDIRECT_URI)
Note:
I prefer to create a config module that holds all my credentials and then import that, obviously this isn't secure at all so other methods would be used if we are worried about securty
#spconfig.py
CLIENT_ID = 'CLIENT_ID'
CLIENT_SECRET = 'CLIENT_SECRET'
REDIRECT_URI = 'https://login.microsoftonline.com/common/oauth2/nativeclient'
AUTHORITY_URL = 'https://login.microsoftonline.com'
AUTH_ENDPOINT = '{tenant}/oauth2/v2.0/authorize?{0}'
TOKEN_ENDPOINT = '{tenant}/oauth2/v2.0/token'
SCOPES = ['User.Read','offline_access','Files.ReadWrite', 'Files.ReadWrite.All', 'Sites.ReadWrite.All']
We still need to obtain a token for so well need to authorize our application for the requested scopes. Afterwards we will obtain the authorization code from the response.
def login(graph):
    auth_base = config.AUTHORITY_URL + config.AUTH_ENDPOINT
    authorization_url, state = graph.authorization_url(auth_base)
    graph.auth_state = state
    return authorization_url

def authorized(authorization_response, graph):
    graph.fetch_token(config.AUTHORITY_URL +\
                        config.TOKEN_ENDPOINT, \
                        client_secret=config.CLIENT_SECRET,\
                        authorization_response=authorization_response)
    return graph.token

auth_url=login(graph)
print('You need to authorize the application,\
please go to this url and paste back the response')
print(auth_url)
auth_response=input('Response URL:')
token=authorized(auth_response, graph)
The login function generates a URL that asks for authorization from the user (along with the login to Office 365). This generates an authorization code that then will be used to authorize our application and generate a token.
Now that we have our initial token, we also have a refresh_token that can be used to generate new tokens when one expires.
requests_oauthlib already can take care of this. It will just change the initialization or our session object.
refresh_url=config.AUTHORITY_URL +config.TOKEN_ENDPOINT
extra = {
'client_id': config.CLIENT_ID,
'client_secret': config.CLIENT_SECRET,
}

Graph=requests_oauthlib.\
OAuth2Session(config.CLIENT_ID,
             token=token,
             auto_refresh_url=refresh_url,
             auto_refresh_kwargs=extra,
             token_updater=token_saver)
The important part of this call is the token_updater parameter which lets us define a function that saves our refreshed token. For example if we were saving it to a text file it would look like this:
def token_saver_text(token):
    with open('file_storage', 'w') as outfile:
        json.dump(token, outfile)
SharePoint Class
Since we are going to be using this specific method of uploading and dealing with our SharePoint site quite often we chose to create a class to handle all of that.
Initialization
First we will need to initialize our class. In the initialization has two different paths depending on if redis or a text token storage is used (one of the computers I use to run some code is still on Win 7 so redis on docker won't work).
We will also need to check if the token exists at the location specified or not. If it is not it will kick off the auth workflow previously defined.
def __init__(self, token_type='text',**kwargs):
  #REQUIRED TO MAKE requests_oauthlib play nice
    os.environ['OAUTHLIB_INSECURE_TRANSPORT'] = '1'
    os.environ['OAUTHLIB_RELAX_TOKEN_SCOPE'] = '1'
    os.environ['OAUTHLIB_IGNORE_SCOPE_CHANGE'] = '1'

    # token to define if the token needs to be created or not
    self.na_token_flag=True

    #chek kwargs for correct arguments
    if ('filename' in kwargs) & ('redis_conn' in kwargs):
        raise TypeError('Cannot define both filename and redis connection')
    #if we want a text token define a path[filename], if it exists good if not create a blank file. If the file exists attempt to load the token.

    if token_type=='text':
        try:
            if path.exists(kwargs['filename']):
                print('File exists')
                with open(kwargs['filename']) as json_file:
                    self.token = json.load(json_file)
                self.na_token_flag=False
                self.file_storage=kwargs['filename']
            else:
                print('File doesnt exist')
                self.create_token_storage('text',kwargs['filename'])
                self.na_token_flag=True
        except:
            #print('No filename passed')
            raise NameError('No Filename was passed')
    #If redis is selected try to get a redis connection else create a redis key pair for the token values
    elif token_type=='redis':
        self.get_redis_conn(kwargs['redis_conn'])
        self.redis_params=kwargs['redis_conn']
        try:
            self.gtoken=json.loads(self.token_storage.\
                                  get(self.redis_params['key']))
            self.na_token_flag=False
        except:
            print('Token does not exist')
            self.create_token_storage(token_type,
                                      self.redis_params['key'])
            self.na_token_flag=True
In the case that the token needs to be created the authorization process will be to create a oauth session without it request the login and authorization process to get a token and then create a new session using the newly created token and the correct token updater function for that specific token storage type.
#If the token does not exist:
if self.na_token_flag:
    old_graph=requests_oauthlib.OAuth2Session(config.CLIENT_ID,
    scope=config.SCOPES,redirect_uri=config.REDIRECT_URI)
    #Ask for authorization and login
    auth_url=self.login(old_graph)
    print('You need to authorize the application,\
    please go to this url and paste back the response')
    print(auth_url)
    auth_response=input('Response URL:')
    #Select the correct token saver function, store the token once
    try:
        self.gtoken=self.authorized(auth_response, old_graph)
        if token_type=='redis':
            self.token_saver_redis(self.gtoken)
        elif token_type=='text':
            self.token_saver_text(self.gtoken)
    except:
        raise ValueError('Token could not be obtained')
refresh_url=config.AUTHORITY_URL +config.TOKEN_ENDPOINT
    extra = {
    'client_id': config.CLIENT_ID,
    'client_secret': config.CLIENT_SECRET,
    }
    if token_type=='redis':
        self.Graph=requests_oauthlib.\
        OAuth2Session(config.CLIENT_ID,
                     token=self.gtoken,
                     auto_refresh_url=refresh_url,
                     auto_refresh_kwargs=extra,
                     token_updater=self.token_saver_redis)
    elif token_type=='text':
        self.Graph=requests_oauthlib.\
        OAuth2Session(config.CLIENT_ID,
                     token=self.gtoken,
                     auto_refresh_url=refresh_url,
                     auto_refresh_kwargs=extra,
                     token_updater=self.token_saver_text)
Now that we have the session created we can move on to define methods to simplify our interactions with SharePoint.
SharePoint Methods
Since I mostly will use this class to upload files into SharePoint document libraries the methods I define are mostly to navigate the file structure.
The first one we will need is to be able to find to set the specific site we are dealing with and also getting all the drives (document libraries in it)
def set_siteid(self, domain,url):
    siteid_url='https://graph.microsoft.com/v1.0/sites/'+domain+':/sites/'+url+'?$select=id'
    #Get the siteid from the get request
    info=self.Graph.get(siteid_url).json()
    self.siteid=info['id']
    #set all the drives at that site and get their ids
    self.drives=self.get_drives()
    self.__dnames={x['name']:x['id'] for x in self.drives['value']}

def get_drives(self):
    check_drives='https://graph.microsoft.com/v1.0/sites/'+self.siteid+'/drives'
    drives=self.Graph.get(check_drives).json()
    return drives
Once we know all the drives and their id's we can define functions that allow us to set the drive we are working it and also navigate the children that exist.
def set_drive(self,drive_name):
    try:
        self.__curr_drive=self.__dnames[drive_name]
    except:
        raise KeyError('Folder does not exist in drive')

def get_drive_items(self):
    drive=self.__curr_drive
    try:
        iurl='https://graph.microsoft.com/v1.0/drives/'+\
        drive+'/items/root/children'
        self.__drive_item={x['name']:x['id'] for x in
          self.Graph.get(iurl).json()['value']}
        return self.__drive_item
    except:
        raise ValueError('Error accessing drive')

def get_drive_folders(self):
    drive=self.__curr_drive
    try:
        iurl='https://graph.microsoft.com/v1.0/drives/'+\
        drive+'/items/root/children'
        it=self.Graph.get(iurl).json()

        fls={}
        for i in it['value']:
            if 'folder' in i:
                fls[i['name']]=i['id']
        return fls
    except:
        raise ValueError('Error accessing drive')

def get_drive_folder_items(self,itemid):
    fltemp='https://graph.microsoft.com/v1.0/drives/{}/items/{}/children'
    try:
        fitems=self.Graph.get(fltemp.format(self.__curr_drive,itemid))
        if fitems.status_code==200:
            return fitems
        else:
            print(fitems.status_code)

            raise RuntimeError('MS Graph call was unsuccessful')
    except:
        raise RuntimeError('Something went wrong')

def get_subfolders(self,itemid):
    it=self.get_drive_folder_items(itemid).json()
    fls={}
    for i in it['value']:
        if 'folder' in i:
            fls[i['name']]=i['id']
    return fls
Now that we have a way to navigate the document library we can go ahead and upload different documents into the library
def upload_file(self,folder,name, data, headers):
    UP_Path='https://graph.microsoft.com/v1.0/drives/{}/items/{}:/{}:/content'
    UP=UP_Path.format(self.__curr_drive, folder, name)
    try:
        res=self.Graph.put(UP,data=data, headers=headers)
        if res.status_code==201:
            print('File Uploaded')
            return res
        else:
            print(res.status_code)
            return(res)
    except:
        raise RuntimeError('Something went wrong')
So if we wanted to upload a pdf file into a certain folder. We can do the following:
filename='super_cool_report.pdf'
SP.set_siteid('sharepoint url to site')
SP.set_drive('Document Library Name')
folder_id=SP.get_drive_folders()['Folder Name']

headers={'Content-Type':'application/pdf',
        'Content-Encoding':'base64'}
with open(filename,"rb") as up_file:
  encoded_string = up.read()

SP.upload_file(folder_id, filename, encoded_string, headers)
This will upload the file called super_cool_report.pdf to the selected document library.
One good thing about using this with Office 365 is that I can add a check to see when any of my reports run and upload a file into the SharePoint without writing any code.
Power Automate (previously Flow) already has a recipe to do so.

Code at my github.