
Tldr Github link
As most people in the last 2 years, I've been spending a lot of time in front of my computer both on zoom calls and playing video games.
At some point during I sale I ended up downloading Sounpad from steam. This is just a small programs that allows you to play sounds over the same audio interface as your mic. So people you are speaking to will hear that same sound. I don't stream or anything like that but I do enjoy playing the jeopardy soundtrack when people are taking to long to make a move.
The main problem I ran into was that I either keep forgetting what hotkey goes to what sound, or when running the program in my second monitor id have to alt-tab out of the game since the mouse was being captured.
At first I just thought of purchasing an elgato streamdeck. Which solve the problem, but frankly it seemed overkill for what I wanted and too expensive. I have screens laying around everywhere so I can just create a program that allows me to control the sounds being played on my PC from my tablet.
Host Process
Playing the sounds
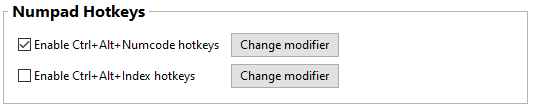
As I mentioned before I am using Soundpad. It works pretty well and as I mentioned I already had it. One option that Soundpad has is that it allows us to use Ctrl+Alt+Numpad numbers as hotkeys (which I do not believe will overlap with anything else I run).
I can setup the specific hotkey to trigger the desired sound.
Pressing the hotkeys
However I do not want to actually press Ctrl+Alt+Numpad to make the action happen. In order to automate this with python we use pyinput.
pip install pynputThen in our code we can setup the following
from pynput.keyboard import Key, Controller, KeyCode

keyboard = Controller()

NUMPAD_VK = {}
for n in range(0,10):
    NUMPAD_VK[str(n)] = 96 + n

def press_hotkey(data: str):
    with keyboard.pressed(Key.ctrl):
        with keyboard.pressed(Key.alt):
            for n in data:
                keyboard.press(KeyCode.from_vk(NUMPAD_VK[n]))
                keyboard.release(KeyCode.from_vk(NUMPAD_VK[n]))
The code is pretty self explanatory. The only thing that is a bit weird is the NUMPAD_VK dictionary. What we are doing is appending converting a string of for example '1' to add 96 and become 97. This is to make it match the Virtual Keyboard code that pynput expects for Numpad inputs.
Communication
As I normally do whenever I need any sort of network communication I turn to FastAPI. Since I want to have a fast reaction from when I send a number to the host and the sound is played I turn to to using a websocket. FastAPI already has a tutorial on their documentation on how to use websockets.
from fastapi import FastAPI, WebSocket
from fastapi.responses import HTMLResponse
from fastapi_crudrouter import SQLAlchemyCRUDRouter

app = FastAPI()

@app.websocket("/ws")
async def websocket_endpoint(websocket: WebSocket):
    await websocket.accept()
    while True:
        data = await websocket.receive_text()
        with keyboard.pressed(Key.ctrl):
            with keyboard.pressed(Key.alt):
                for n in data:
                    keyboard.press(KeyCode.from_vk(NUMPAD_VK[n]))
                    keyboard.release(KeyCode.from_vk(NUMPAD_VK[n]))

if __name__ == '__main__':
    uvicorn.run(app, host='0.0.0.0')
Now if I run a js script like I can send messages back and forth between a browser and my program.
<script>
var ws = new WebSocket("ws://localhost:8000/ws");
ws.onmessage = function(event) {
    var messages = document.getElementById('messages')
    var message = document.createElement('li')
    var content = document.createTextNode(event.data)
    message.appendChild(content)
    messages.appendChild(message)
};
function sendMessage(event) {
    var input = document.getElementById("messageText")
    ws.send(input.value)
    input.value = ''
    event.preventDefault()
};
function sendBtn(btn) {
    var btn_val=btn.value;
    ws.send(btn_val);
};
</script>
Storing the hotkeys (buttons)
Since I don't want to have to redefine my hotkeys every single time we spin up a database to handle storing out data. Since this is a simple application we can use sqlite.
For this we define a traditional api, with GET, POST, PUT, DELETE routes.
We define our db connector and our method to dependency
from sqlalchemy import create_engine
from sqlalchemy.ext.declarative import declarative_base
from sqlalchemy.orm import sessionmaker

from sqlalchemy import Integer, Column, String

from pydantic import BaseModel

from fastapi_crudrouter import SQLAlchemyCRUDRouter

SQLALCHEMY_DATABASE_URL = "sqlite:///D://sql_app.db"

engine = create_engine(
    SQLALCHEMY_DATABASE_URL, connect_args={"check_same_thread": False}
)

SessionLocal = sessionmaker(autocommit=False, autoflush=False, bind=engine)

Base = declarative_base()


def get_db():
    db = SessionLocal()
    try:
        yield db
        db.commit()
    except Exception:
        db.rollback()
        raise
    finally:
        db.close()
From there we define our sqlalchemy class
class Buttons(Base):
    __tablename__ = "buttonlist"

    id = Column(Integer, primary_key=True, index=True)
    order = Column(Integer, unique=True, index=True)
    name = Column(String, nullable=False)
    num = Column(Integer, nullable=False)


Base.metadata.create_all(bind=engine)
Note that we generate the metadata right there since this is a very simple operation and I don't expect to have to do any migrations or similar.
We then define our schemas for the api:
class ButtonBase(BaseModel):
    order: int
    name: str
    num: int


class Button(ButtonBase):
    id: int

    class Config:
        orm_mode = True


class ButtonCreate(ButtonBase):
    pass
and finally we define out router:
button_router = SQLAlchemyCRUDRouter(
    schema=Button,
    create_schema=ButtonCreate,
    db_model=Buttons,
    db=get_db,
    prefix='buttons'
)

app.include_router(button_router)
now if we run
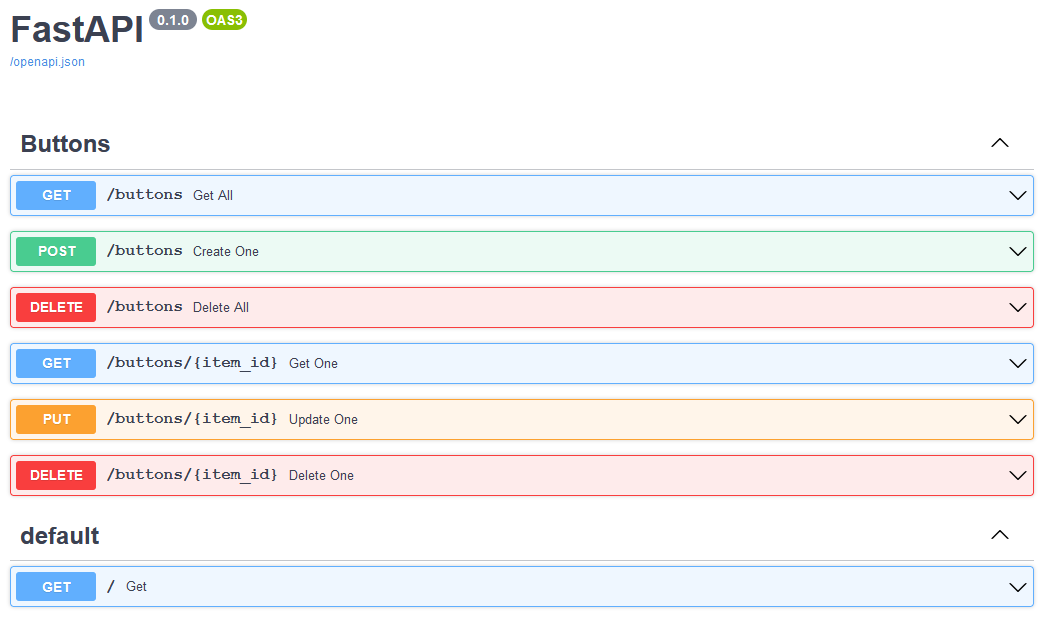
uvicorn server.main:app --host 0.0.0.0We can navigate to localhost:8000/docs and see that our api is operational.
FRONTEND
Creating the soundboard
In order to interact the soundboard we create a website in vue.
The setup for this is 2.0 with Router and Vuex.
vue create clientthis creates a file structure as follows:
client
    -src
        -assets
        -components
        -store
        -router
        -views
        App.vue
        main.js
The heavy lifting in terms of interacting with the db is done with vuex.
import Vue from 'vue';
import Vuex from 'vuex';
import axios from 'axios';

/* eslint no-shadow: ["error", { "allow": ["state"] }] */

Vue.use(Vuex);

const state = {
  buttons: [],
};

const getters = {
  buttonList: (state) => (state.buttons),
};

const actions = {
  async fetchButtons({ commit }) {
    const response = await axios.get('http://{your ip}/buttons');
    commit('setButtons', response.data);
  },
  async addButton({ commit }, button) {
    const response = await axios.post('http://{your ip}/buttons', button);
    commit('addNewButton', response.data);
  },
  async editButton({ commit }, payload) {
    const response = await axios.put(`http://{your ip}/buttons/${payload.id}`, payload.data);
    commit('modButton', response.data);
  },
  async deleteButton({ commit }, id) {
    await axios.delete(`http://{your ip}/buttons/${id}`);
    commit('removeButton', id);
  },
};

const mutations = {
  setButtons: (state, buttons) => {
    state.buttons = buttons;
  },
  addNewButton: (state, button) => { state.buttons.unshift(button); },
  modButton(state, button) {
    const index = state.buttons.findIndex((item) => item.id === button.id);
    state.buttons[index].name = button.name;
    state.buttons[index].num = button.num;
    state.buttons[index].order = button.order;
  },
  removeButton(state, id) {
    const ibutton = state.buttons.filter((button) => button.id !== id);
    state.buttons.splice(ibutton, 1);
  },
};

export default new Vuex.Store({
  state,
  getters,
  actions,
  mutations,
});
This is farily standard for vuex, we have our actions to be dispatched from the code, mutations to modify the store and getters to obtain our button list.
Finally we create a ButtonsAll.vue component. The whole code is available on github but basically we fire our getter on mounting the component and then iterate over the buttons to create the layoug using bootstrap-vue's b0row to handle the dynamic tables.
      <b-container class="bv-example-row">
        <b-row cols="1" cols-sm="2" cols-md="4" cols-lg="6">
          <b-col class="p-1" v-for="button in buttonsAll" :key="button.id">
            <div class="h-100" style="min-height: 10vh">
              <b-button size="md" class="w-100 h-100" variant="primary" @click="onButtonSel(button)"
            @contextmenu="onBtnContext(button, $event)">
            {{button.name}}</b-button>
            </div>
          </b-col>
          <b-col class="p-1">
            <b-button class="w-100 h-100"
            variant="outline-success" @click="onReset" v-b-modal.create-btn-modal>+</b-button>
          </b-col>
        </b-row>
      </b-container>
Finally how we handle sending the message is pretty straight forward. The application connects to the websocket and sends the message accross. We just make sure to connect to the Websocket on mounting the component.
methods: {
    sendMessage(message) {
      this.connection.send(message);
    },
mounted() {
    this.$store.dispatch('fetchButtons');
    console.log('Starting connection to WebSocket Server');
    this.connection = new WebSocket('ws://{your ip}/ws');
    this.connection.onmessage = function (event) {
      console.log(event);
    };

    this.connection.onopen = function (event) {
      console.log(event);
      console.log('Successfully connected to the echo websocket server...');
    };
  },
The rest of the code handles the usual modal form submission for communication with sqlite.
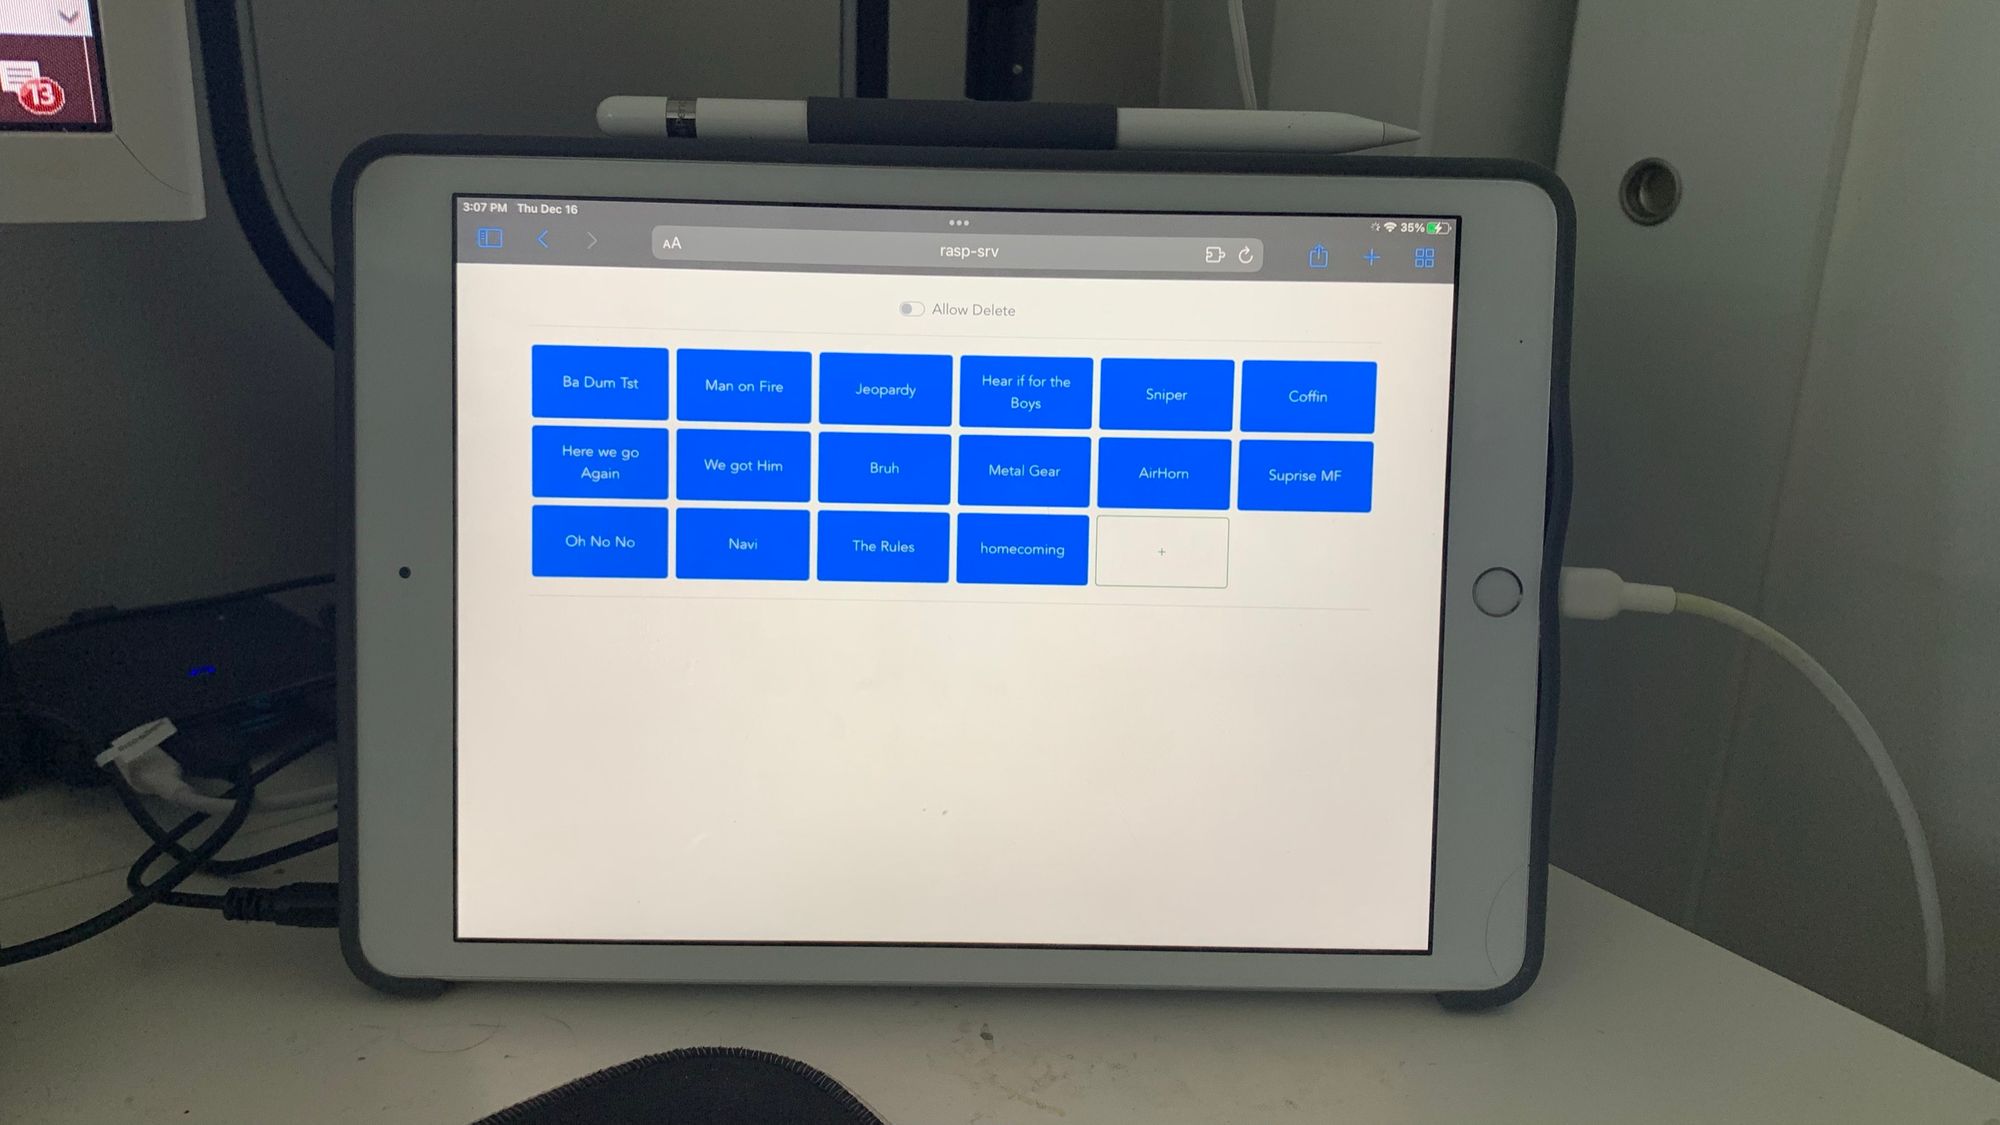
The whole thing ends up looking like this.
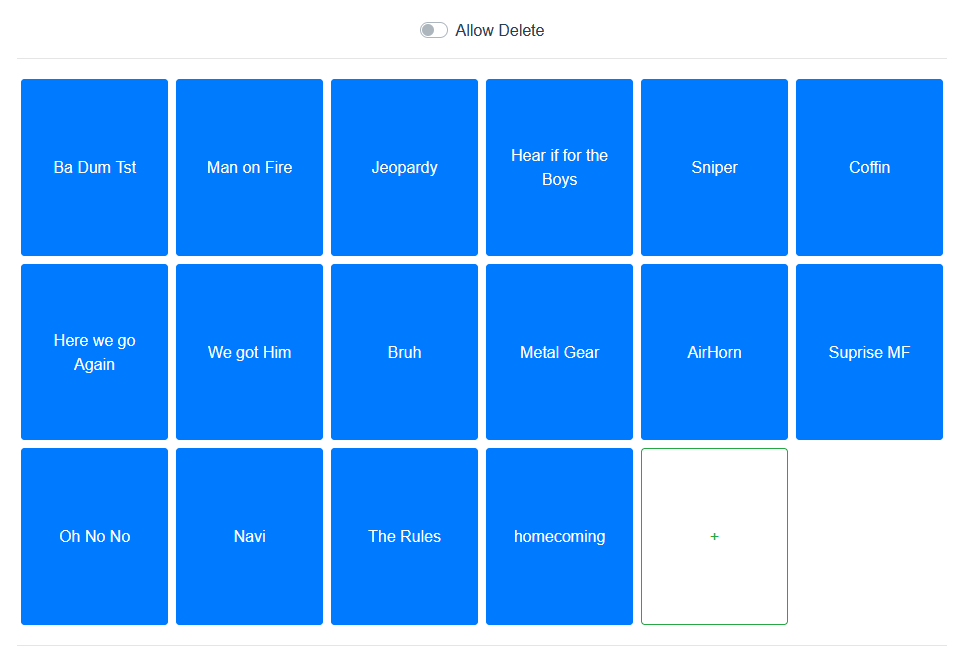
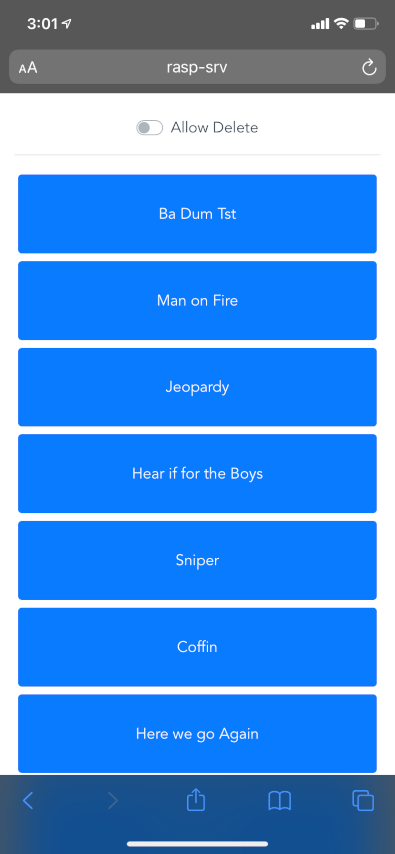
I actually host the webserver client on a spare raspberry pi on my network and that lets me just go to rasp-srv:8080/soundboard to access and I dont have to run the client on my main computer.
That means I can access it from anywhere (tablet, phone, etc.) and it should resize properly. For example on my phone it will look like this.
Finishing touches
Since I want to be able to start and stop the host process with ease, and also not jump on the cmd line I created an exe so that I could pin it to the taskbar. I also created an icon so I could quickly identify what the program does.
To do so I just did the following
pip install pyinstallerpyinstaller --onefile --icon=icon.ico server/main.py
that way I can fire it from the taskbar

Now I can greatly annoy my friends when playing warzone without having to Alt+Tab out of it.
This could obviously be expanded to accomplish more complex stuff and probably doesn't even need to use Soundpad and could switch to something like pyaudio.
The code can be found here.