

Data entry is not something I'm particularly fond of, but for most of the work I do its a necessary evil. While writing the queries is not to big of a deal sometimes it is nice to have a dedicated tool to deal with specific tables and simplify the data entry.
This becomes even more important if the person that is going to be performing the data entry is someone without query writing knowledge.
One way to address this is to generate a quick QT application which will allow us to skip creating a web server as we would normally do.
Setup
For this application I chose to use MongoDB with the mongoengine python module. This could easily be changed to use sqlalchemy instead is we didn't want to roll with a NoSQL DB.
We can easily deploy a MongoDB instance in a docker container.
version: '3.7'

services:
    mongodb:
        image: mongo:latest
        container_name: mongodb
        restart: always
        environment:
            MONGO_INITDB_ROOT_USERNAME: admin
            MONGO_INITDB_ROOT_PASSWORD: pwd
            MONGO_INITDB_DATABASE: Test
        networks:
          - default
        ports:
            - 27017:27017
        volumes:
            - ./mongo-init.js:/docker-entrypoint-initdb.d/mongo-init.js:ro
            - mongodata:/data/db
volumes:
  mongodata:
    driver: local
Since we don't want to provide every user of the application admin credentials we create specific users with write access to the Test database.
In the docker cli we do the following
mongo
use Test
db.createUser({user: TestUsr, pwd:"12345", roles:["readWrite"]})

# We can check if it was succesful
db.getUsers()
We also need to make sure we have PyQt5 and mongoengine installed.
pip install PyQt5
pip install mongoengine
Project Structure
Our QT project will be broken into controllers, model, resources and views.
|   app.py
|   config.py
|   README.md
|   tree.txt
|   update_ui.bat
|
+---controllers
|   |   main_ctrl.py
|
+---model
|   |   model.py
|
+---resources
|   |   DbSub.ui
|   |   DbView.ui
|   |   ui_DbSub.py
|   |   ui_DbView.py
|
+---views
|   |   dbs.py
|   |   login.py
- controllers: will handle signals between our different windows
- model: keeps track of our different values across the application.
- resources: stores our qtdesigner .ui files and its generated .py files.
- views: This is actually generate the logic of our views using the python ui files and handles the individual view logic.
Other than that we also have our app.py and our update_ui.bat which converts our .ui to python.
Creating UI Layouts
PyQT ships with a couple of tools that help streamline the application workflow. One of the most useful ones is Qt Designer, usually found in ...ENVNAME/Scripts/pyqt5designer.exe.
Here we just drag and drop the specific UI components into where we want them and can modify their names and properties.
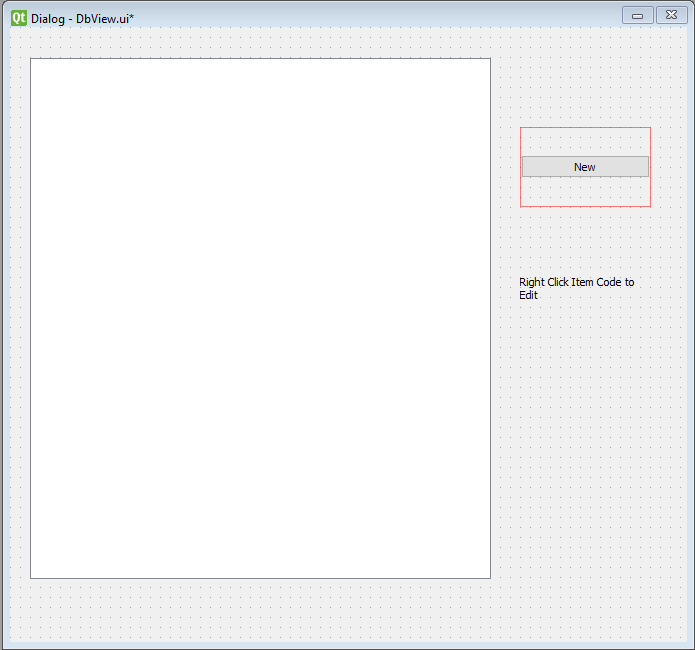
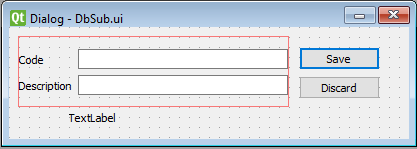
We generate two different windows.
We save the UI files in the resources folder. We then convert them into python modules. To streamline the process we just create a bat file as follows.
call activate ENVNAME
pyuic5 resources/DbSub.ui -o resources/ui_DbSub.py
pyuic5 resources/DbView.ui -o resources/ui_DbView.py
pause
Setting up the Model
We now need a way to store some information while the application is running. To do so we create a Qt Model object.
from PyQt5.QtCore import QObject, pyqtSignal

class Model(QObject):
    def __init__(self):
        super().__init__()
        self.__username = "us"
        self.__password = "ps"

    def set_username(self, username):
        self.__username = username

    def get_username(self):
        return self.__username

    def set_password(self, password):
        self.__password = password

    def get_password(self):
        return self.__password
In our case we really only use it to handle the credentials to access our MongoDB.
View Control
We need to setup our main controller which will allow us to switch from view to view.
So for example to handle our login information we would have the following view.
class Login(QtWidgets.QWidget):

    switch_window = QtCore.pyqtSignal()

    def __init__(self, model, config):
        QtWidgets.QWidget.__init__(self)
        self.setWindowTitle('Login')
        self._model = model
        self._config = config
        layout = QtWidgets.QGridLayout()

        self.usr = QtWidgets.QLineEdit()
        self.pwd = QtWidgets.QLineEdit()
        '''
        Additional Logic for entry validation and layout
        '''

    def login(self):
        self._model.set_username(self.usr.text())
        self._model.set_password(self.pwd.text())
        self.connect_to_Mongo()
        try:
            mgd.get_db()
            self.switch_window.emit()
        except Exception as e:
            if e.code==18:
                QtWidgets.QMessageBox.critical(self,'Auth Error','Could not authorize')
            mgd.disconnect()
        #self.switch_window.emit()

    def connect_to_Mongo(self):
        self.mg=mgd.connect(self._config.DB,
        username=self._model.get_username(),
        password=self._model.get_password())
The important aspect is to define a signal switch_window to emit when we want to switch windows.
We also define methods to handle the logic of creating the mongoengine connection and check to see if its authorized by using the pymongo commands to grab a db and catch authorization errors. If the error is detected we create a QMessageBox to inform the user.
from views.login import Login
from views.dbs import ItemsView

class Controller:

    def __init__(self, model, config):
        self._model=model
        self._config=config
        pass

    def show_login(self):
        self.login = Login(self._model,self._config)
        #self.login.switch_window.connect(self.show_main)
        self.login.switch_window.connect(self.show_item_view)
        self.login.show()

    def show_item_sub(self,*args):
        dialog.open()
This generates a binding between the previously generated signal switch_window and connect it to a function to bring forward another dialog. We can use this method to bring different windows to the front.
Displaying DB Table information
Now that we have a way to store the user credentials and a MongoDB connection. We can query the DB and display the information.
First we define the structure for our Items Document Collection.
class Items(mgd.Document):
    code=mgd.StringField(require=True, unique=True, max_length=10)
    desc=mgd.StringField(require=True, max_length=50)
We also create a Table Model to display our information
class TableModel(QtCore.QAbstractTableModel):

    def __init__(self, data):
        super(TableModel, self).__init__()
        self._data = data

    def data(self, index, role):
        if role == QtCore.Qt.DisplayRole:
            # See below for the nested-list data structure.
            # .row() indexes into the outer list,
            # .column() indexes into the sub-list
            return self._data[index.row()][index.column()]

    def rowCount(self, index):
        # The length of the outer list.
        return len(self._data)

    def columnCount(self, index):
        # The following takes the first sub-list, and returns
        # the length (only works if all rows are an equal length)
        return len(self._data[0])
We then modify the Ui_DbView from resources. We also create a signal to let us know when a certain cell is right clicked to add additional functionality.
class ItemsView(QtWidgets.QDialog):
    cellselected=QtCore.pyqtSignal('QString', name='cellselected')
    def __init__(self, model, config):
        QtWidgets.QDialog.__init__(self)
        self.ui=Ui_DbView()
        self.ui.setupUi(self)
        #Install additional custom event filters
        self.ui.dbView.installEventFilter(self)
        #Load our Model and Configuration
        self._model = model
        self._config=config
        # Read our database and display
        self.readDB()

  def readDB(self):
      #self.mg=mgd.connect(self._config.DB,
      #username=self._model.get_username(),
      #password=self._model.get_password())
      data=[[x.code, x.desc] for x in Items.objects().all()]
      if len(data)>0:
          model = TableModel(data)
          self.ui.dbView.setModel(model)
      self.ui.dbView.horizontalHeader().setStretchLastSection(True)

      self.ui.dbView.setSortingEnabled(True)

    # Define filter to grab when clicks have happend over the TableView
    def eventFilter(self, source, event):
        if (event.type() == QtCore.QEvent.ContextMenu and event.reason()==0 and source is self.ui.dbView):
            #print(source.model().index())

            indexes=source.selectedIndexes()
            if len(indexes)==1:
                if indexes[0].isValid():
                    index=indexes[0]
                    print(source.model().index(index.row(),0).data())
                    self.cellselected.emit(source.model().index(index.row(),0).data())
The readDB function just does a simple query against the Item table and generates the Table Model. The eventFilter fires off on events the view and it they match the ContextMenu type fires off the cellselected signal. In the main controller we then connect that signal to our function to generate a form to modify the document.
def show_item_view(self):
      self.itemsview=ItemsView(self._model, self._config)
      self.itemsview.cellselected.connect(self.show_item_sub)
      self.itemsview.ui.CreateItem.clicked.connect(lambda: self.show_item_sub())
      self.login.close()
      self.itemsview.show()

def show_item_sub(self,*args):
    if len(args)==1:
        selected=args[0]
        dialog=ItemForm(self.itemsview,ccode="%s"%selected)
        dialog.setWindowTitle('Modify Record')
    else:
        dialog=ItemForm(self.itemsview)
        dialog.setWindowTitle('New Record')
    dialog.finished.connect(lambda: self.update_item_view())
    dialog.open()
Modifying DB Records
The last part of our logic is the view which allows us to modify a MongoDB Document. The important aspects of that view is the logic to update the db
class ItemForm(QtWidgets.QDialog):
    def __init__(self,parent, **kwargs):
        super().__init__(parent)
        self.ui=Ui_DbSub()
        self.ui.setupUi(self)

        # Read our kwargs to see if its to modify our document or create a new one
        if "ccode" in kwargs:
                #log.info("Kick off Comp Type Update")
                self.ui.CodeIn.setText(kwargs['ccode'])
                self.ui.CodeIn.setEnabled(False)
                self.res=Items.objects(code=kwargs['ccode']).first()
                self.old_value=self.res.desc
                self.ui.DescIn.setText(self.old_value)
                self.ui.FBtn.clicked.connect(self.btn_click)
        else:
            log.info("Kick off New")
            self.old_value='New'
            self.ui.FBtn.clicked.connect(self.btn_click)

    #Delete our document
    def destroy(self):
        self.res.delete()
    #If we accpet and our text fulfills our requirement update or create a new document
    def accept(self):
        print(self)
        if self.old_value==self.ui.DescIn.text():
            log.warning('Tried to update same value')
        elif self.old_value=='New':
            try:
                ccode=self.ui.CodeIn.text()
                cdesc=self.ui.DescIn.text()
                if (len(ccode)>=3 and len(cdesc)>=3):
                    ccode="%s"%ccode
                    cdesc="%s"%cdesc
                    Items.objects(code=ccode).upsert_one(set_on_insert__desc=cdesc)
                    QtWidgets.QDialog.accept(self)
                else:
                    log.warning("COMP CODE and DESC LESS THAN 3 CHARACTERS")
            except:
                log.error('Could not insert value')
        else:
            try:
                self.res.desc="%s"%self.ui.DescIn.text()
                self.res.save()
                log.info("Updated Comp Desc to: %s"%self.ui.DescIn.text())
                QtWidgets.QDialog.accept(self)
            except:
                log.error('Could not update value')
Taking advantage of the *kwargs that way we can use the same class to generate the form for modification vs new document. To handle the modification we use upsert_one matching on the item code. On the upsert we only change the description of the item (define by set_on_insert__desc).
This will setup a simple application that is somewhat modular that we can use to handle data entry to multiple tables, modify rows and delete records.
To start the application we just do python app.py.
import sys
from PyQt5.QtWidgets import QApplication
from model.model import Model
from controllers.main_ctrl import Controller
import config

class App(QApplication):
    def __init__(self,sys_argv):
        super(App, self).__init__(sys_argv)
        self.model=Model()
        self.config=config.test()
        self.main_controller=Controller(self.model,self.config)
        self.main_controller.show_login()

if __name__ == '__main__':
    app=App(sys.argv)
    sys.exit(app.exec_())
The full project with some additional functionality is here