

In my previous post I went over how to create the an API to handle all my daily to do's and help me keep a daily log.
In this post I'll go over how I generated the front end of the system, both a bulk data entry system and a nice dashboard to go on a touch screen Raspberry Pi 3.
Setup
To handle the frontend I chose to go with Vue to keep it simple. This excellent tutorial explains most of what I needed to do.
The most important parts are insalling vue and its cli:
$ npm install -g @vue/cli@4.5.11
Now we can create a skeleton of a vue app with the following command:
$ vue create client
We select the following features:
- Vue 2.x
- ESLint + Airbnb config
- Lint on save
- In package.json
This will create project for us. We will create the folder structure as follows:
client
    -src
        -assets
        -components
            -mixins
        -router
        -views
        App.vue
        main.js
Additionally we will be using bootstrap, axios, vuex and moment for style, api calls, local storage and time management. To install we just need to do
$ npm install axios@0.21.1 --save
$ npm install bootstrap@4.5.0 --save
$ npm install boostrap-vue@2.21.2 --save
$ npm install @4.5.0 --save
$ npm install vuex@3.6.2 --save
$ npm install moment@2.29.1 --save
We can check that everything is working so far by doing
cd client
npm run serve
The sample Vue page will then be available at localhost:8080
Project Structure
Since I like to keep separate modules for easier expansion we modify the project structure to look like this:
client
  -src
    -assets
    -components
      -activity
      -mixins
      -tasks
      -vitamin
      -water
    -router
    -store
    -views
    App.vue
    main.js
Each of the component folders will contain the different smaller components for each module. So for example the water folder will look like this:
-water
  -Water_Control.vue
  -Water_Progress.vue
  -Water_Records.vue
and we can then simly use those components in our Dashboard and their view without rewriting code.
Creating the Router
Now that we have a basic setup we can start working on our website. Setting up the router is pretty straight forward.
First we modify our main.js file as follows
import { BootstrapVue, BootstrapVueIcons } from 'bootstrap-vue';
import moment from 'moment';
import Vue from 'vue';
import App from './App.vue';
import router from './router';
import store from './store';
import 'bootstrap/dist/css/bootstrap.css';

Vue.use(BootstrapVue);
Vue.use(BootstrapVue);

Vue.config.productionTip = false;

new Vue({
  router,
  store,
  render: (h) => h(App),
}).$mount('#app');
This just tells our app to use Boostrap and tells it where the css is. Imports the App we created and imports the router.
We will discuss vuex later, but to use it we are importing ./store and then using it in our Vue app.
App.vue will just contain our header to be used for navigation and define our fonts to be used.
<template>
  <div id="app">
    <div id="nav">
      <router-link to="/dashboard">Dashboard</router-link> |
      <router-link to="/water">Water</router-link> |
      <router-link to="/vitamin">Vitamin</router-link> |
      <router-link to="/activity">Acitvity</router-link> |
      <router-link to="/task">Task</router-link> |
    </div>
    <router-view/>
  </div>
</template>

<style>
#app {
  font-family: Avenir, Helvetica, Arial, sans-serif;
  -webkit-font-smoothing: antialiased;
  -moz-osx-font-smoothing: grayscale;
  color: #2c3e50;
  margin-top: 60px;
}

#nav {
  padding: 30px;
}

#nav a {
  font-weight: bold;
  color: #2c3e50;
}

#nav a.router-link-exact-active {
  color: #42b983;
}
</style>
We define a router link to each of out different components that we defined for the API in this case the water component.
Now we can handle each of our components and assign a data entry page for each of them by modifying index.js.
import Vue from 'vue';
import VueRouter from 'vue-router';
import Water from '../views/Water.vue';
import Task from '../views/Task.vue';
import Vitamin from '../views/Vitamin.vue';
import Activity from '../views/Activity.vue';
import Dashboard from '../views/Dashboard.vue';

Vue.use(VueRouter);

const routes = [
  {
    path: '/water',
    name: 'Water',
    component: Water,
  },
  {
    path: '/vitamin',
    name: 'Vitamin',
    component: Vitamin,
  },
  {
    path: '/task',
    name: 'Task',
    component: Task,
  },
  {
    path: '/activity',
    name: 'Activity',
    component: Activity,
  },
  {
    path: '/dashboard',
    name: 'Dashboard',
    component: Dashboard,
  },
];

const router = new VueRouter({
  mode: 'history',
  base: process.env.BASE_URL,
  routes,
});

export default router;
For each of our routers we define its name and the component to import. This will handle all the navigation for us.
API Calls
In order to simplify creating all the components and not have to define our API calls in each we will be using a Vuex Store. In order to do so we define the ./store folder and within in it a index.js file.
For Vuex we have 4 main sections.
- state
- getter
- actions
- mutations
So for example to handle the water section of our application we would first define a state variable to hold our information.
const state = {
  current_water: 0,
  water_goal: 0,
  waters: [],
}
Now we need to define the actions that will make the api calls to each API endpoint.
const actions = {
  getCurrent({ commit }) {
    const path = `http://{YOUR IP}/water/get_day_results/${getCurrentDate()}`;
    axios.get(path)
      .then((res) => {
        commit('SET_CURRENT_WATER', res.data);
      })
      .catch((error) => {
        // eslint-disable-next-line
        console.error(error);
      });
  },
  getWaters({ commit }) {
    const path = 'http://{YOUR IP}:8000/water';
    axios.get(path)
      .then((res) => {
        commit('SET_WATERS', res.data);
      })
      .catch((error) => {
        // eslint-disable-next-line
        console.error(error);
      });
  },
  getCurrentGoal({ commit }) {
    const path = 'http://{YOUR IP}:8000/water_goal/current/';
    axios.get(path)
      .then((res) => {
        commit('SET_WATER_GOAL', res.data);
      })
      .catch((error) => {
        // eslint-disable-next-line
        console.error(error);
      });
  },
};
Each of these calls a specific Mutation that will be in charge of changing our state variables.
const mutations = {
  SET_CURRENT_WATER(state, CurrentWater) {
    state.current_water = CurrentWater;
  },
  SET_WATER_GOAL(state, Goal) {
    state.water_goal = Goal;
  },
  SET_WATERS(state, Waters) {
    state.waters = Waters;
  },
};
This is all done so we don't have to define these Axios (AJAX) calls in each component and keep the same state accessbile from multiple modules. It also has the added benefit of allowing us to update the information in each page without having to re-render all of it.
Component Design
Now that we have a way to reliable obtain the information from the API we can design all the widgets that we need to control and display our daily information.
Accessing the information contained on the Vuex Store is very simple.
For example if we want to show a progress bar with how much water has been consumed the controller will look like this
// Water Progress
<template>
<div class="row">
  <div class="col-sm-2">
    <span><strong>Water</strong></span>
  </div>
  <div class="col-sm-10">
  <template v-if="current_water">
  <b-progress :max="current_water_goal.size" height="2rem">
    <b-progress-bar :value="current_water.sum">
        <span><strong>Water: {{ current_water.sum }} / {{ current_water_goal.size }}
          </strong></span>
    </b-progress-bar>
  </b-progress>
  </template>
  </div>
</div>
</template>

<script>
export default {
  name: 'WaterProgress',
  computed: {
    current_water() {
      return this.$store.state.current_water;
    },
    current_water_goal() {
      return this.$store.state.water_goal;
    },
  },
  mounted() {
    this.$store.dispatch('getCurrent');
    this.$store.dispatch('getCurrentGoal');
  },
};
</script>
The elemets contained within the <template> tag define the html rendering part of our module. Since we are using bootstrap-vue we can just define the progress bar using
In the script portion we define the computed properties to contain the information that will be updated form the vuex store.
  computed: {
    current_water() {
      return this.$store.state.current_water;
    },
    current_water_goal() {
      return this.$store.state.water_goal;
    },
In order to use those values inside the rendered html we bind the computed property to the necessary property in the b-progress input. This is done using :, and in parts were we want to display the actuall value in the computed property we just use `{{}}
<b-progress :max="current_water_goal.size" height="2rem">
    <b-progress-bar :value="current_water.sum">
        <span><strong>Water: {{ current_water.sum }} / {{ current_water_goal.size }}
          </strong></span>
    </b-progress-bar>
</b-progress>
Finally we need to make sure that the data currently loaded is updated when we mount the component.
This is done with
  mounted() {
    this.$store.dispatch('getCurrent');
    this.$store.dispatch('getCurrentGoal');
  },
Which uses the methods outlined in the actions of the Vuex index.js file.
Putting it all together
Now that we have the components we can just import them into our Dashboard view. The advantage of doing it this way is that it allows us to apply additionaly modifiers to our imported components in terms of layout.
So to import them into our dashboard we do as follows:
<template>
  <div class="container">
    <div class="col-sm-8">
      <waterprogress></waterprogess>
    </div>
  </div>
<template>
<script>
import WaterProgress from '@/components/water/Water_Progress.vue';
export default {
  name: 'Dashboard',
  components: {
    waterprogress: WaterProgress,
  },
};
As we develope more modules we can add them to the dashboard and since all of them are connected to the vuex store the changes will be updated from the same data.
For example my final dashboard ended up looking like this.
<template>
  <div class="container">
      <div class="row">
          <div class="col-sm-8">
            <waterprogress></waterprogress>
          </div>
          <div class="col-sm-4">
            <watercontrol @clicked="watercontrolClicked()"></watercontrol>
          </div>
      </div>
      <hr>
      <div class="row">
        <div class="col-sm-8" style="overflow-y: scroll; height: 300px">
            <vprogress >
            </vprogress>
        </div>
        <div class="col-sm-4" style="overflow-y: scroll; height: 300px">
            <tdaily></tdaily>
        </div>
      </div>
      <hr>
      <div class="row">
        <div class="col-sm-12">
          <actdaily></actdaily>
        </div>
      </div>
  </div>
</template>

<script>
// Water Module
import WaterProgress from '@/components/water/Water_Progress.vue';
import WaterControl from '@/components/water/Water_Control.vue';

// Vitamin Module
import VitaminProgress from '@/components/vitamin/Vitamin_Progress.vue';

// Task Module
import TaskDaily from '@/components/tasks/Task_Day.vue';

// Activity Module
import ActDaily from '@/components/activity/Activity_Day.vue';

export default {
  name: 'Dashboard',
  components: {
    waterprogress: WaterProgress,
    watercontrol: WaterControl,
    // vitamin section
    vprogress: VitaminProgress,
    // task section
    tdaily: TaskDaily,
    // activity section
    actdaily: ActDaily,
  },
  methods: {
    watercontrolClicked() {
      this.$store.dispatch('getCurrent');
      this.$store.dispatch('getCurrentGoal');
    },
    vcontrolClicked() {
      this.$store.dispatch('getCurrentVitamins');
    },
  },
};
</script>
Which gives me a nice dashboard that looks like this:
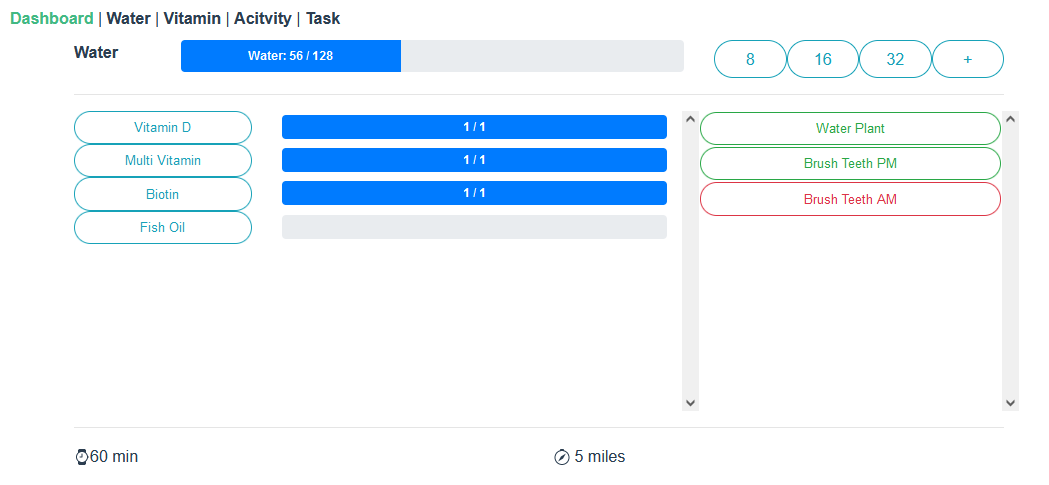
Conclusion
Obviously not every step of the front end or the api is discussed here, and I am sure that there are mistakes made specially with Vue since its not my forte. But its works well enough and it can be accessed on multiple devices on my home network, In my case I have it displayed on Raspberry PI mounted on top of my desk.
The repository for the final project can be accessed here